I am so excited to be part of this Christmas blog hop hosted by Hometalk.com and Country Living.com. A huge thank you to Donna of Funky Junk and Miriam of Hometalk for organizing this event that is sure to inspire you with lots of great ideas for your home for Christmas...
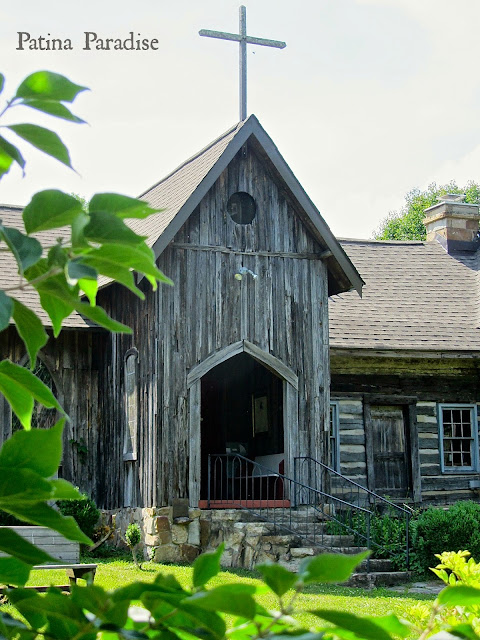
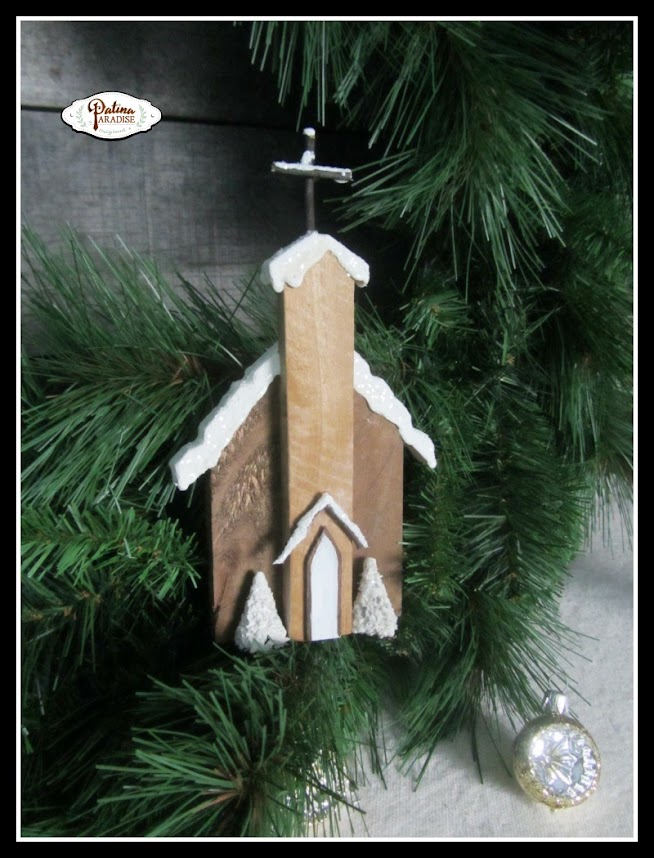
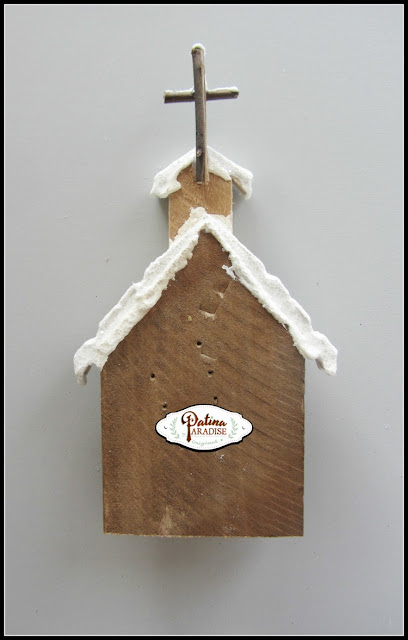
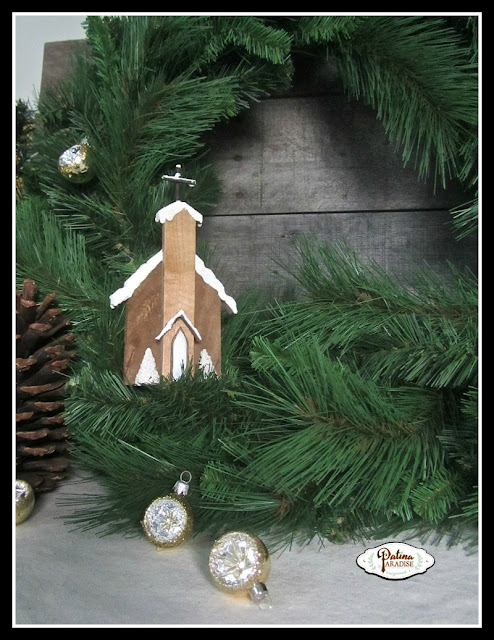
St. Joseph on the Mountain in Mentone, Alabama, I wanted to make a stylized and simple church made with pallet wood.
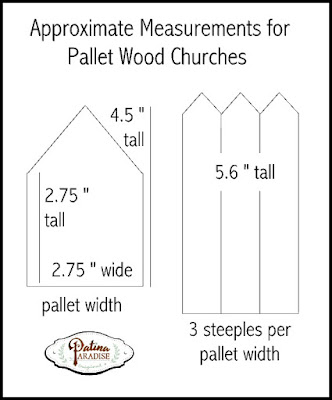
What you will need for this project...
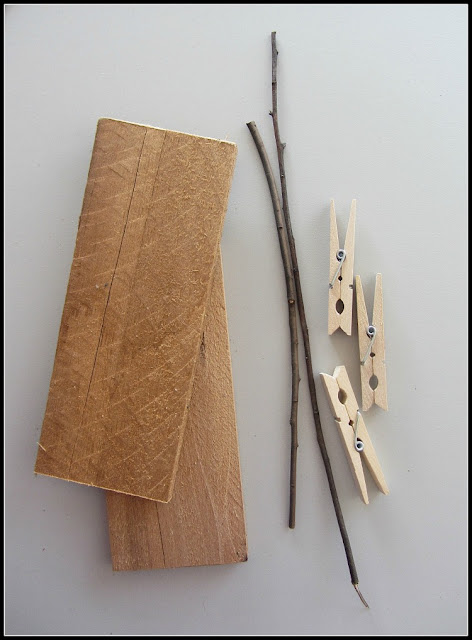
- pallet wood (flat and without nails)
- wooden clothespins (medium sized)
- small twigs
- stain for wood (glaze or watered down paint would work also.
- faux snow (recipe below) (optional)
- glue stick and hot glue
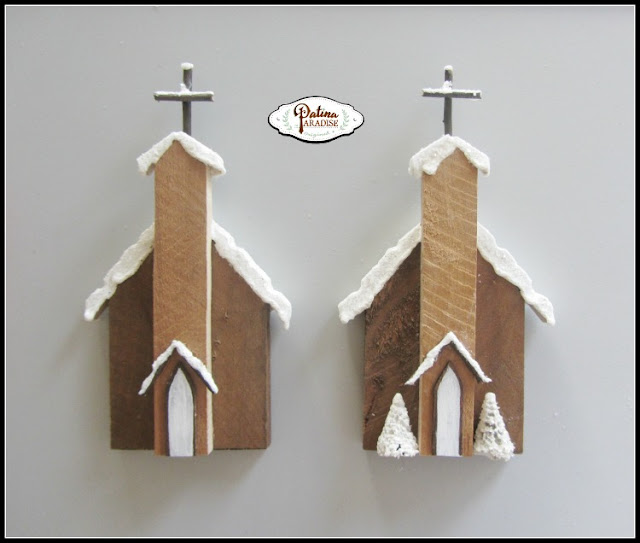
- mini bottle brush trees (optional)
Steps...
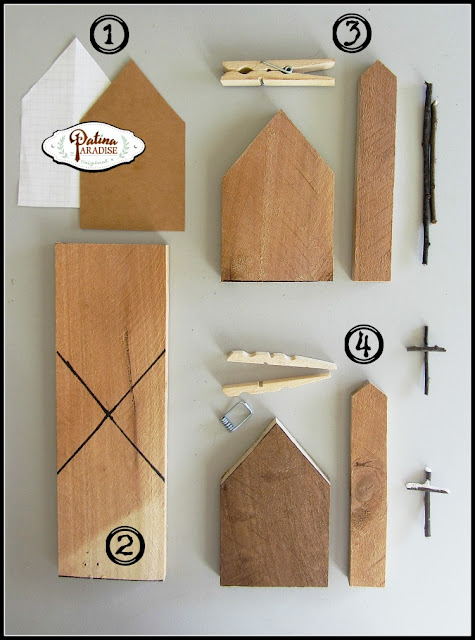
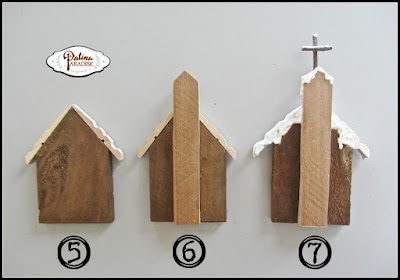
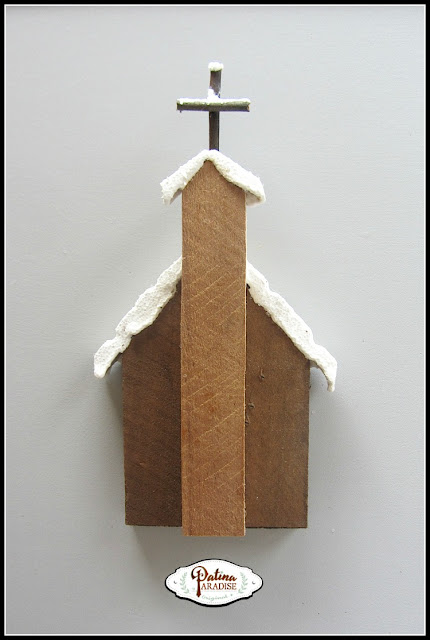
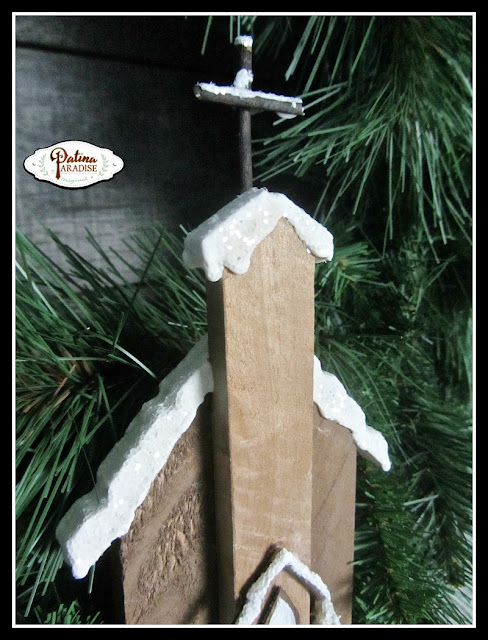
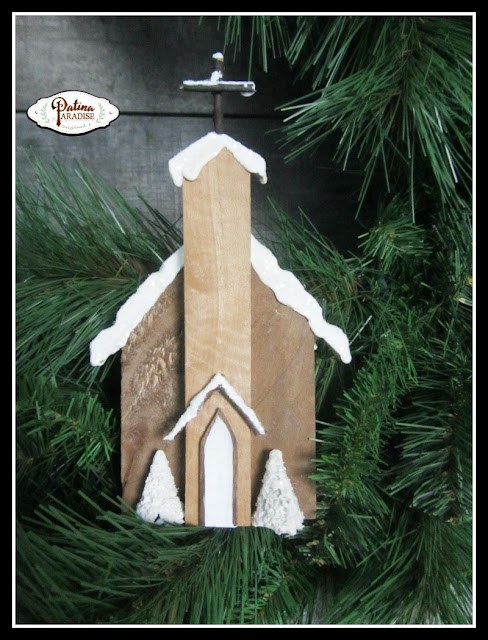
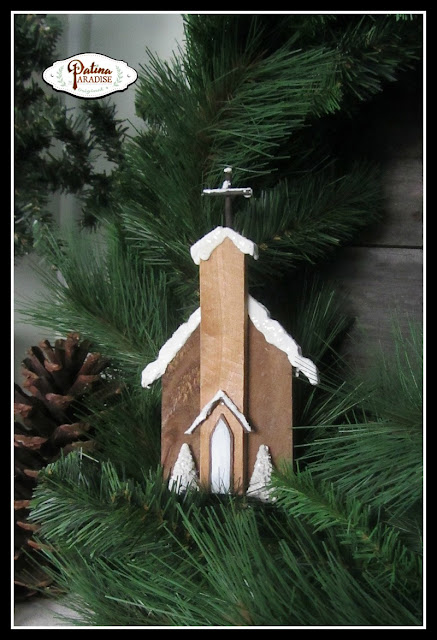
1) Print out a paper template and cut out a cardboard shape to trace around.2) Trace out the main buildings and steeples onto your pallet wood piece. 3) Cut out your shapes and find some thin twigs for the cross. The clothespins are on the small side and were bought at the Dollar Tree. (They are the perfect fit for the dimensions of the template above).
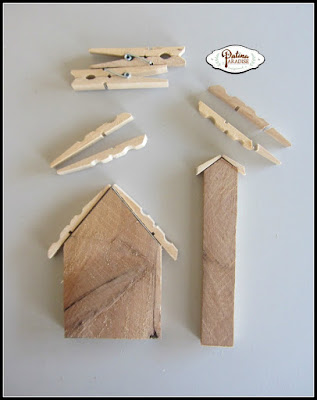
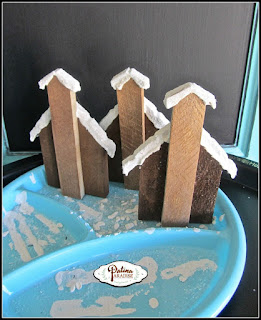
4) Darken the main piece with glaze or something else to give it contrast with the natural wood color of the steeple. (You could use watered down acrylics). Take apart the clothespin. It will be used as the roof. Cut the twig into two small pieces that will become the cross. Hot glue them together. Add the faux snow to all of the crosses that you have made for the number of churches that you plan on making.
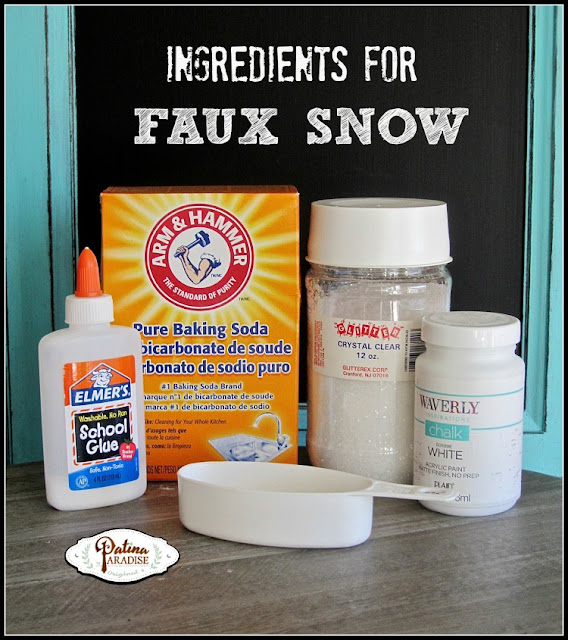
Recipe...
- 1/2 cup Baking Soda
- 1/2 cup White Glue
- 2 tbsps. White Chalk Paint or Craft Paint
- 1-2 tsps. Warm Water (Only use if the mixture is too thick)
Directions...
Using a container of your choice add the first 3 ingredients. (I mixed mine in a plastic container that had a lid so that I could store it when not in use). Mix well with a whisk or fork, or hand held blender. The consistency should be like that of cream cheese frosting. Do a drip test on a piece of scrap wood. It should pretty much stay put. If it is too runny add more baking soda, if it is too thick, add a tsp. of warm water. It can be stored for a few days. The glitter is also optional, but should be sprinkled on top before the faux snow dries. (Wash out your brush when you are done with soap and water.)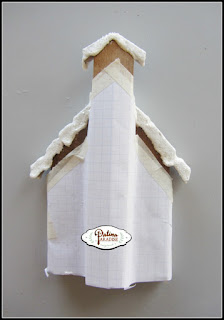
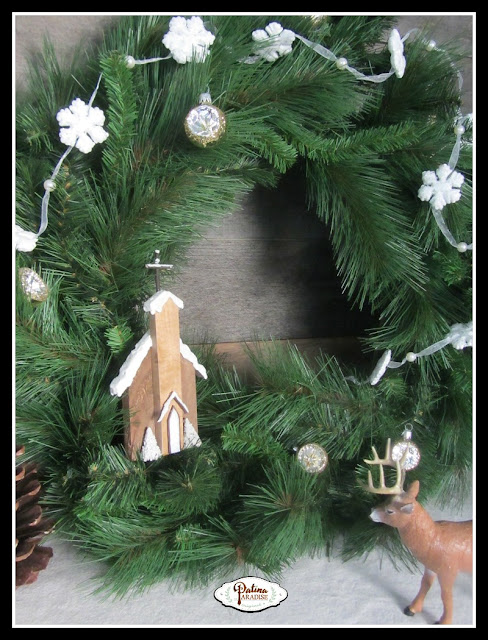

It was a true labor of love that was a week in the making. It is definitely one of my favourite creations.
Wishing you peace and blessings,
Lucy
Make sure to check out all of the other links to projects below and to look for the hashtag #homeforchristmas on social media...
An InLinkz Link-up
Sharing at these locations...
MONDAYS
Something to Talk About @ Spain Hill Farm
Inspire Me Monday @ Sand and Sisal
The Scoop @ Stone Gable
Project Inspire @ Cupcakes and Crinoline
Before and After Linkup @ Thrifty Decor Chick
TUESDAYS
Moonlight and Mason Jars @ Cherished Bliss
Inspire Me Tuesday @ A Stroll Thru Life
Wow Us Wednesdays @ Savvy Southern Style
Vintage Inspiration Party @ My Salvaged Treasures
Dream Create Inspire @ Refresh Living
Swing into Spring @ DIY by Design
What's It Wednesdays @ Ivy And Elephants
WEDNESDAYS
Creative Spark @ Two Purple Couches
Share Your Cup Thursday @ Have a Daily Cup of Mrs. Olson
Home and Garden Thursday @ A Delightsome Life
Share Your Style @ The Vintage Nest
Treasure Hunt Thursday @ From My Front Porch to Yours
THURSDAYS
Brag Worthy Thursday @ Bless'er House
Think and Make Thursdays @ Little Red Brick House
The Creative Circle @ Up to Date Interiors
Vintage Charm @ Charm Bracelet Diva
Shabbilicous Fridays @ The Shabby Art Boutique
Feathered Nest Fridays @ French Country Cottage
Simple and Sweet Fridays @ Rooted In Thyme
The Inspiration Gallery @ craftberry bush
Creativity Unleashed @ Practically Functional
Show and Tell Friday @ My Romantic Home
the weekend retreat @ AKA Design
Inspiration Friday @ The Painted Drawer
FRIDAYS
A morning Cup of Joe @ The Cottage Market
Upcycled Link Party @ Funky Junk Interiors
SATURDAYS
Saturday Sparks @ Pieced Pastimes
Share it One More Time @ One More Time Events
DIY Sunday Showcase @ The Interior Frugalista
Sundays at Home @ Love of Home
SUNDAYS
Silver Pennies Sundays @ Finding Silver Pennies
Inspired By You @ Reinvented
Inspiration Monday @ What Meegan Makes
Amaze Me Mondays @ Dwellings


What gorgeous ornaments...they are so cute and look great on your wreath! Love them!
ReplyDeleteThis is such a precious ornament, Lucy - pinned it!
ReplyDelete~Angie @ Knick of Time
Loving these Lucy and they are perfect on your wreath! Awesome idea!
ReplyDeleteLucy, great tutorial. I would have never guess the roof was clothespins but they are perfect with the little bumps and covered with snow. I've got to try making snow! Pinning and sharing everywhere!
ReplyDeleteLucy,
ReplyDeleteYour churches are truly adorable! I love everything about them! I'm pinning!! Thank you for sharing.
Cat
So adorable and charming! And your faux snow looks so good! Thanks for the inspiration! Happy holidays!
ReplyDeleteVery cute! Looks great with your style!
ReplyDeleteLucy this is so adorable! I love it and I love the way that snow looks! I've got to do this - if not this year next year for sure!
ReplyDeleteWhat a clever idea! I love the faux snow!
ReplyDeleteYou are very talented my friend! It's just the right amount of rustic. And you're right, I can see it on a wreath just as easily as on a tree. Yes, I believe God smiled down on this one:) xokathleen
ReplyDeleteThis is so cute! I love it! Perfect addition to a wreath of other holiday decor.
ReplyDeleteYou are very creative. These are so cute I love the way they look on the wreath!
ReplyDeleteVery cute Lucy - love the rusticness of these little churches. The faux snow is awesome. Cathy
ReplyDeleteLucy this is so cute and thank you for sharing the snow recipe!
ReplyDeleteThat is beyond darling! Pinning and sharing!
ReplyDeleteLucy, this church ornament is fantastic. I love that it can be made with pallet wood. Pinning:). Have a wonderful week and take care, Tara
ReplyDeleteThank you so much for stopping by ladies and for all the kind comments! ;o)
ReplyDeleteOh my gosh Lucy, I adore the little church you made and it looks so awesome in your wreath. Love Love Love!!! Pinned to share :)
ReplyDeleteThese are just adorable, what a great idea!!
ReplyDeleteWow....I love these little churches. The clothes pin roof is wonderful. What a great project. Pinning and sharing.
ReplyDeleteThis is cute! And so excited that I know how to make fake snow now.
ReplyDeleteThis is SO cute! Thank you for sharing your excellent tutorial at Vintage Inspiration Party.
ReplyDeleteThis is so classic and rustic. It's beautiful and what a keepsake this will be! I'm so glad the faux snow recipe worked for you, it looks great!! Thank you for the mention. Pinning and sharing
ReplyDeleteThis is really cute! And you shared such a great tutorial for it! Thanks for linking up at our Inspired by You party!
ReplyDeleteThis looks sooo great!!! What a fun idea! I was so excited to see the huge amount of link ups for this hop! There is so much eye candy!! :-) Pinned!!
ReplyDeleteThese are adorable! Great idea!
ReplyDeleteLOVE them. Pinned to my Christmas board. Don't you wish we had a longer season for all the Christmas ideas? I'd love to have your join our party also. It opens on Thursday at 10 P.M. Best wishes, Linda http://www.craftsalamode.com/
ReplyDelete